Wednesday, December 14, 2011

Cinnamon rolls


My friend Caitlin has decided to follow through on her promise (threat?) to set me up with a co-worker of her husband’s, now that she has decided that he (a) does not drink too much to be a satisfactory option and (b) likes to run. Fortunately, this set-up will take place at a running centered event, the Urban Pickle Assault.

How could this not go well? The word Assault is involved. And yes, the four of us will be running around the city with a decorated cucumber taking pictures (hopefully nothing too suggestive, although that could certainly be a conversation starter) and looking for a golden pickle. High for the day is a tropical 44 degrees. 

Just to make sure it goes well, though, I am bringing the following things in my arsenal, which never fail to impress the boys:
  1. Short hair. On a recent foray into the wonderful world of online profiles, I came across one fine gentleman who summed up his interests as follows: “Girls who are fat, lazy, or have short hair need not apply.” Gosh, if only I’d known that my prospective partners in Philadelphia are still living with the gender ideals of the Victorian era, I might not have cut my hair.
  2. Neon orange leg-warmers. That’s right folks, the ‘80s are back. On a whim, I suggested that our team name be the Neon Nerds. The latter word for obvious reasons, the former because at 7am on that particular day, “neon” was the only word that suggested it to my tired brain as a word that also started with “n” and might lead to costumes. As it has. Everyone looks good in neon orange, especially me.
  3. The types of bags under my eyes that make people ask if I’ve been punched in the face. Honestly, I’ve just started answering in the affirmative. “Yep. I did. Of course I won. Geez.” (Not-entirely-related-side-note: In the past year I have become obsessed with the RadioLab podcasts produced by NPR and WNYC, as they are gloriously and unabashedly nerdy, and all about various things relating to science, technology, and modern life. I most recently listened to one about sleep, which suggested that one of the functions of sleep is to work out problems and create solutions that your conscious self can’t. This seems to explain a lot about why teacher sleep is not always as restful as I might like. I am still trying to figure out why a friend confessed envy of my vivid dreams. Nothing says fun like 6 straight hours of dreaming about teenagers-gone-wild.)


Should all these fail, which seems unlikely, I could always start with, “Hey, I made 6 kinds of cookies, a cheesecake, cupcakes, and an apple pie in the last two weeks. And I brought you a cinnamon roll.” Perhaps that would be a gentler introduction to my life. And might make me sound psychotic since it would probably come out of my mouth at about 400 miles an hour.

Now that I’ve confessed my questionable sartorial decisions, I will also add (ironically) that I love Nigella Lawson’s cookbooks, especially the one titled How to be a Domestic Goddess. The irony is astounding, since I am usually baking in running clothes with disheveled hair (it’s amazing to me that such a small amount of hair can look so ridiculous so often), flour everywhere, dirty dishes by the truckload. Have you ever watched one of her cooking shows? As a former anonymous roommate of mine said, “Watching her show just makes you want to get it on.” (Of course, Nigella herself claims that was not her intent. ) I doubt the same could be said of my disaster zone of a kitchen and moderately spastic behavior in which I am more likely to burn myself with steam while making caramel than sensually lick my caramel covered finger. (True story. It happened this weekend while making this AMAZING cheesecake. The burning part. In case you were confused.).

But anyway, sexy or not, I do enjoy her recipes, especially the one for cinnamon rolls since it is (a) delicious and (b) the aforementioned nerd in me enjoys the arrangement of the buns in the pan. So pretty and symmetrical! It is not particularly challenging to make, although if you are afraid of kneading dough for some reason, it might cause you to hesitate briefly. They are mighty tasty. Thank goodness one of my delightful 9th grade advisees requested these for her birthday, even though I totally dropped the ball on making them on the correct day. (Another irrelevant side note for all my adult friends: can we all just take a moment to thank our lucky stars that even though we sometimes complain about getting uncomfortably old, we are no longer in 9th grade? Is this just me? Oh my god. Am I still socially awkward? Sure. But oh my god it is so much less painful now.)

Here goes. Tasty for breakfast, or on the very real chance that you aren’t going to wake up two hours before breakfast to make it (unless you are really, legitimately making an honest effort to impress someone) whatever time of day you make it.

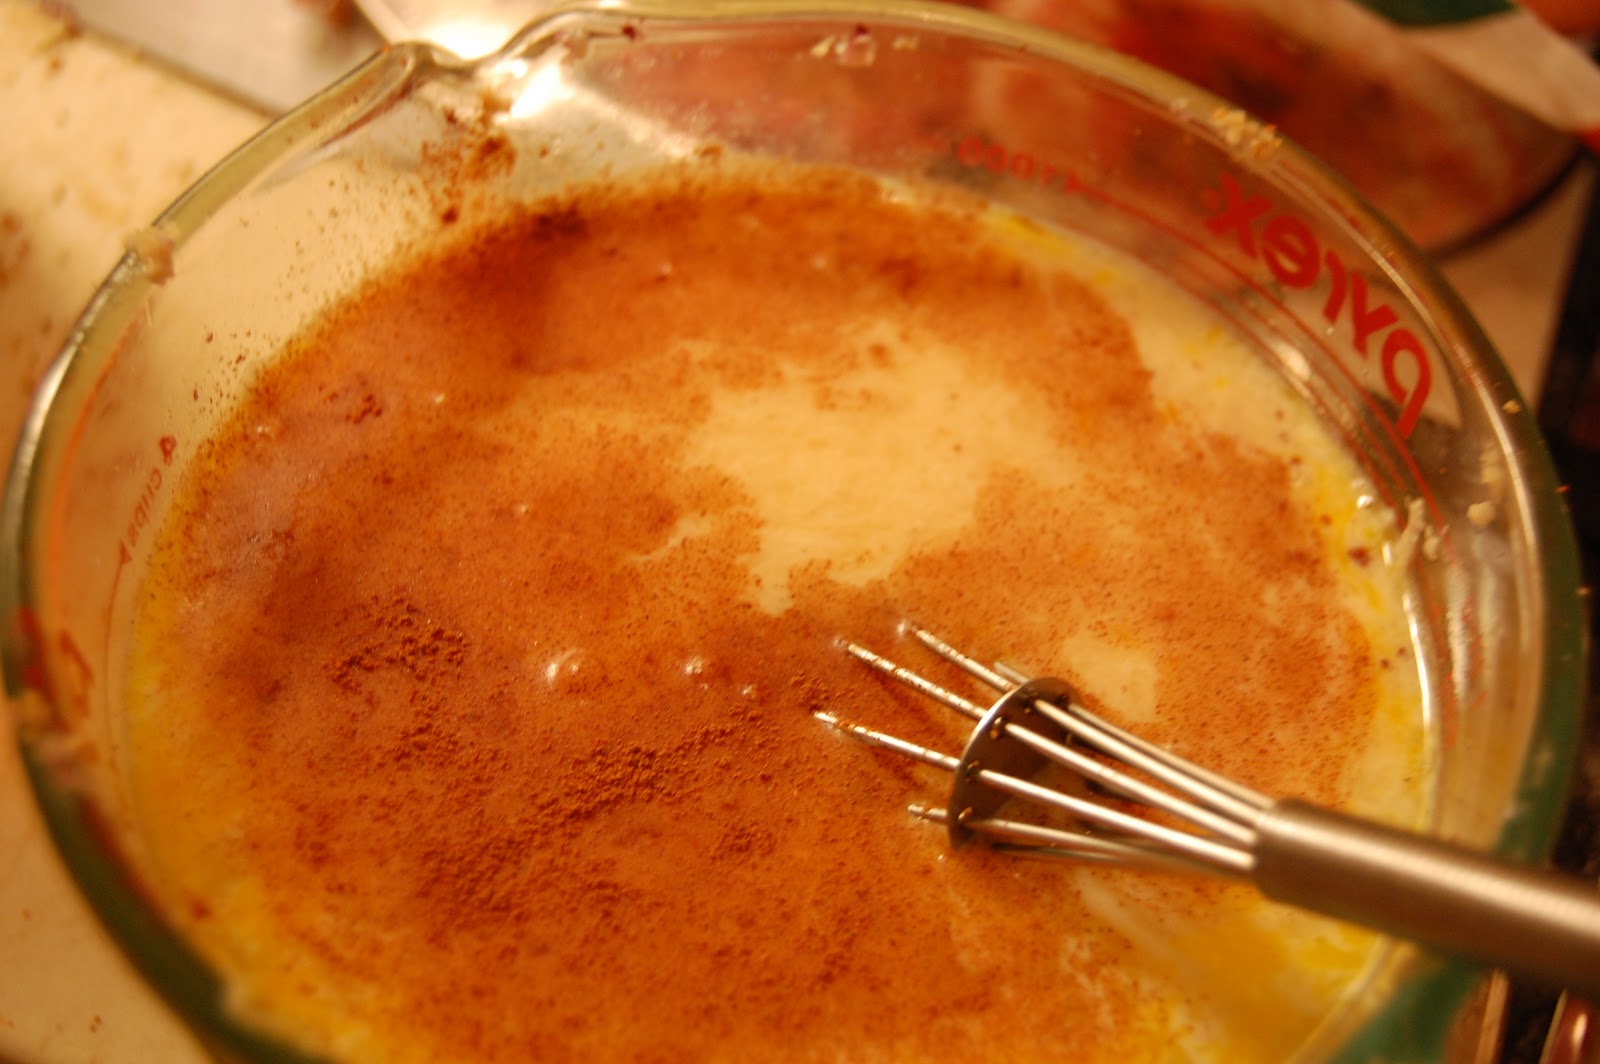
Warning: you DO need parchment paper if you are going to make Nigella’s version. Or probably any version. Cinnamon buns are sticky. Due to an unexpected oversight, there was a two-inch strip left on my roll when I was halfway through this. However, since I am more than a week behind on dishes, this proved not to be a problem because I still had a cookie sheet lined with parchment paper. Seattle trained me well in the arts of recycling.

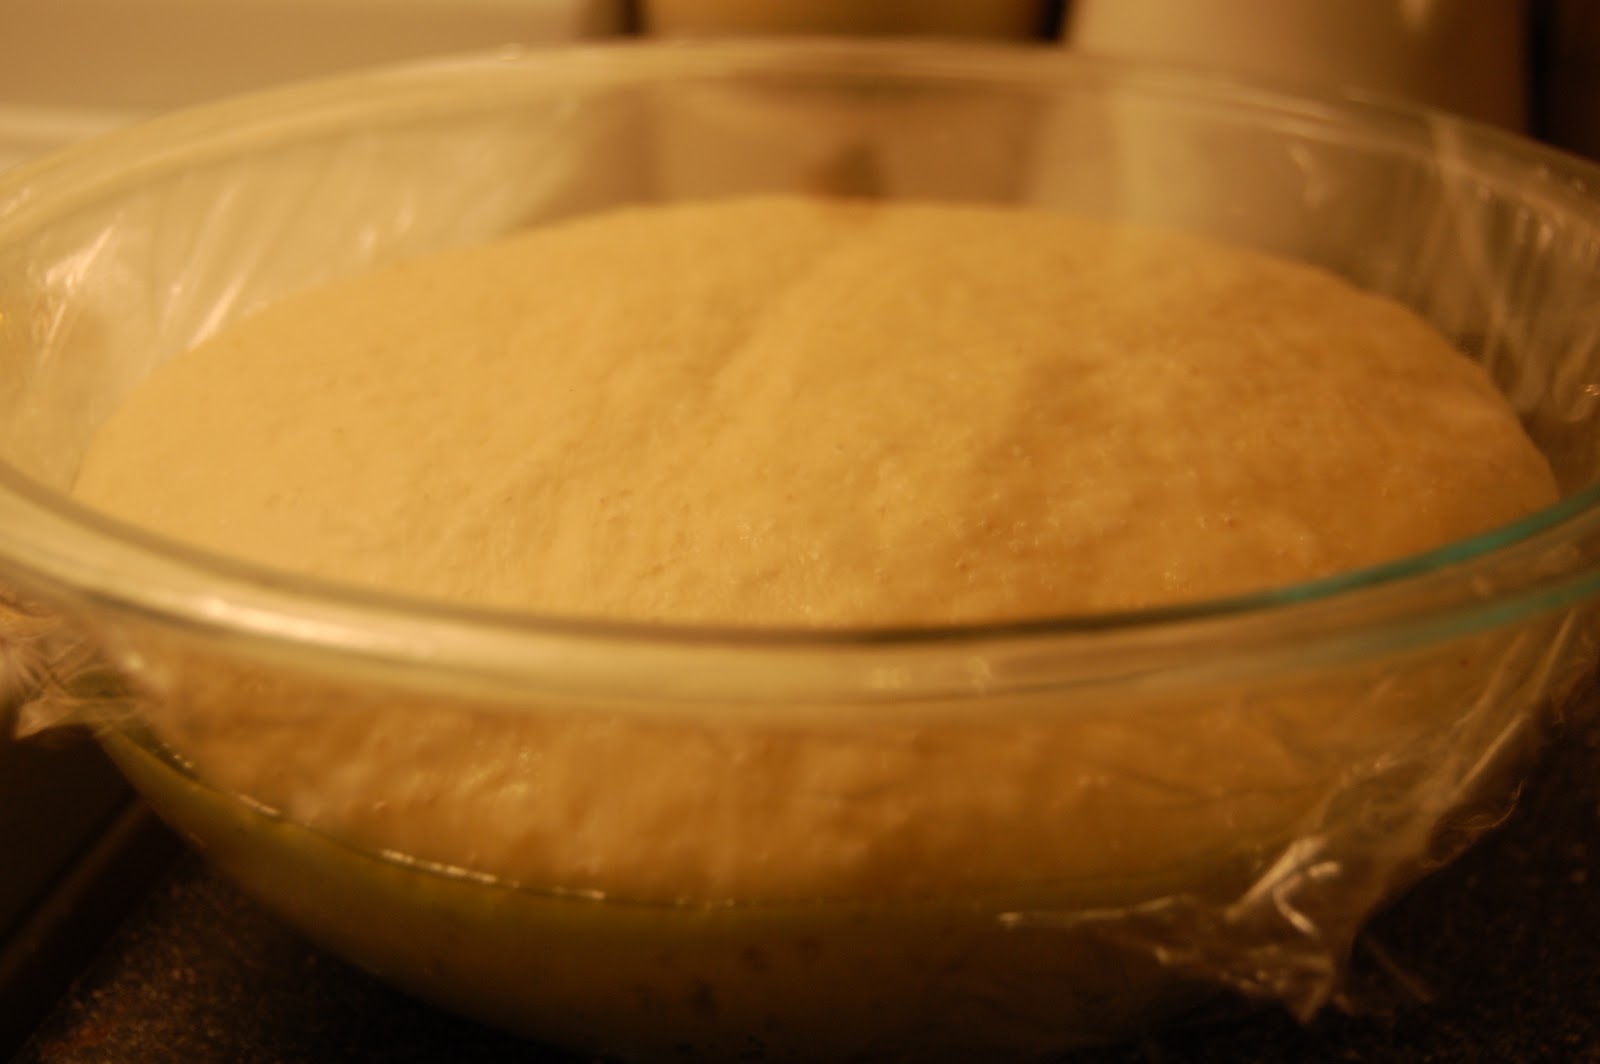
My mom makes delicious cinnamon buns, and just uses a French bread recipe for the dough, which consists primarily of flour, milk, yeast, a bit of sugar and salt. If you go for Nigella’s version, you will also have butter and eggs. I guess it just depends how decadent you want the buns. I always vote for more fat if at all possible.

As there are infinitely many cinnamon roll recipes out there, I will not bore you with the details of this one (plus, I don’t want her copyright-ers to sue me. . .). But here are a few tips about making them in general:
  1. For the filling, it is actually disastrous (in my experience) to have the butter melted all the way. The ideal is a nice soft, room temperature butter, mixed with liberal quantities of cinnamon and sugar so that it forms a sugary paste that you can spread in the desired thickness. Melted butter = disaster.
  2. If you are making individual rolls (as opposed to the single pan cluster here), it frequently happens that if you don’t seal the rolls really well when you put them on the pan, they tend to become unrolled when they rise and puff up. That makes them a little less roll-like and more seashell like. Still tasty, just not as aesthetically pleasing.
  3. These look really tasty and fun as well. And baked in a muffin tin. I briefly thought about making these, until I realized that would require me to clean the muffin tin afterward. Ugh.
  4. You can add fun stuff if you are motivated, like walnuts, pecans, or raisins. Not recommended if part of your target audience is allergic to any of the things you try to add.
  5. Usually best eaten sooner rather than later, which I personally think is true of virtually all baked goods. Not that it’s usually a problem.

Sunday, November 27, 2011

Maple Bourbon Sweet Potato Pie


HAPPY THANKSGIVING!


True to form, Thanksgiving was three days ago, and I have millions of other things I need to do, but I really need to tell you about this recipe. So that you can make it. Right now. Especially because it’s not pumpkin pie (apparently only permissible on Thanksgiving), is actually WAY better than pumpkin pie (sacrilege!), and sweet potatoes are in season (I bought 5 lbs for $2. That’s why I had to make two pies. Sort of.)

Before I start though, I want to share some thankfulness. In no particular order (other than what I’m pretty sure are random neuron firings):

I am thankful that:
  • When my cat knocked a cup of tea on my computer and I was too stupid to deal with that properly, the amazing tech office at my school fixed my computer in one day (and I didn’t even lose my hard drive. . .)
  • I still get carded occasionally, even if the person looking at my driver’s license sometimes bursts out laughing when he sees it.
  • Turkey tetrazzini is not actually as gross as elementary school lunch made it seem. I’d be in an awkward position with some leftovers otherwise.
And I am thankful for bourbon, and the fine people of Maker’s Mark. Because without them, I wouldn’t have been able to make this amazing pie.

I had never had sweet potato pie until I moved to Philadelphia and one of my advisees asked for it for a birthday treat. That could have ended very badly. Here’s me, trying to make my student’s favorite dessert, without having any idea what it’s supposed to taste or look like. It turns out, I actually like regular sweet potato pie better than regular pumpkin pie. Same spices, just as much fatty nonsense, but such a more interesting flavor.

This is not regular. Just read the name. I “had” to buy a bottle of Maker’s Mark to make this recipe (and believe you me, I felt a little bit like a weirdo spending ten minutes in the whiskey aisle at the liquor store trying to decide which one to get. . . On the other hand, perhaps it could be viewed as a life victory that I’ve reached this point in my life without forming strong opinions about whiskey or viewing quality time in the whiskey aisle as a suitable past-time).

(For those of you thinking of visiting, I can now offer a mostly-full bottle of Maker’s Mark as an incentive. . . if you don’t consider that to be an incentive, we may need to reconsider our friendship. How else are we going to make this pie together?)

Let’s get serious.

General rules apply about pie crust (if you know what those are). Cold butter, ice water, fast work, and gentle rolling. If you really want to know all about it, I strongly encourage you to read what this amazing cookhas to say about it. She’s an amazing baker and cook in general, and has delightful instructions. I didn’t actually use this pie crust for the recipe, but I made it three times the next day and it was amazing, so I advocate you using it for this. Or, half of the recipe she includes.

Now, for the interesting part. When I made it, I did a double recipe, which worked out perfectly. I was a little lazy about mashing the sweet potatoes, and overfilled the pre-baked crusts, but everyone survived.

Maple Bourbon Sweet Potato Pie (brought to you by the New York Times Dessert Cookbook, contributed by Karen Bonner of Magnolia Grill)

Ingredients:
2 medium or 3 small sweet potatoes (1.5 pounds)
¾ cup heavy cream
6 tablespoons maple syrup
5 tablespoons dark brown sugar (or light brown, if you forget to read the recipe for specifics ahead of time)
¼ cup bourbon
3 large eggs
1 large egg yolk
1 teaspoon vanilla extract
¼ teaspoon salt
¼ teaspoon “freshly” grated nutmeg (mine was not so freshly)
¼ teaspoon cinnamon
1/8 teaspoon ground cloves (honestly, who is measuring at this point?)
A few grinds black pepper

 
Things you need to do early:
  •    Roast the sweet potatoes for one hour in a 425 degree oven. Before putting them in, skewer them a couple times with a  fork (this is a little challenging). You know they are done when you can skewer them easily (hopefully before burning them). I would strongly urge you to do this on foil so you don’t put yourself in a very awkward pan-cleaning situation.
  •    Make a single pie crust and pre-bake it. Pre-baking involves pre-heating the over to 400 degrees, covering the pie shell in foil, and putting a weight in it (either one of those fancy pie weights, a bunch of beans, or, as a last resort, a hefty metal one-cup measure). After ten minutes, take out the weight and foil, and let it cook until golden brown. Don’t overdo it or you will have a very burned pie later on. Notice the fork holes poked in the bottom of the crust, and the really mediocre job of pinching the top edge of the crust. Whoops.


Things to do later:

  •  Pre-heat oven to 350.
  • Once the sweet potatoes have cooled, de-skin them and mash them to pieces. If you have a potato masher or some other fancy tool, use it. Mashing them with a fork is lame, tedious, and not terribly effective. Unless your standards for mashedness are as low as mine.
  • Here’s my favorite part: combine everything. Make sure the sweet potatoes are legitimately not HOT or you will end up with omelette in your pie. That’s gross. I even like omelettes now and I still think that is gross.
  • Pour batter into pre-baked shell. Put it on a cookie sheet (or if your oven is small and you are making two, don’t do this, cross your fingers, and it’s your fault if you totally destroy your oven. I went with the second option).
  • Bake until filling is just set. (If you jiggle, there are no waves; if you put a knife in near the edge, it comes out clean). I personally feel like there is a pretty broad window for when you can take it out and it will still taste good, so don’t obsess. Says the expert at not-obsessing.
  • Feed it to your co-workers, your significant other, or anyone else you are thankful for. If you lived at my house, I would feed it to you! (Sorry Lionel, cats are not included in that offer). 


On a more serious note, I am thankful for some things:

I am thankful that:
  • I have two brothers who understand why I turned out the way I did, and support and love me in spite of it, and manage to communicate that they care about me from 2,000 or 10,000 miles away. Roughly once every three months.
  • My mom thinks I’m great. And worries about me. Even though she has no idea what I’m doing at this exact moment, I can promise she’s still worrying. How cute!
  • My dad thinks I’m great. And that I can do anything. But never lets me settle for what I have done.
  • My high school friends (I know some of your are reading this) put up with my asinine decision to live in Philadelphia (temporarily) and neglect them (regularly) and let me “make up for it” by sending them chocolate from Switzerland. And they still include me in plans when I am “home”, and are both subtle (ha!) and persistent about encouraging me to move to the correct side of the country.
  •  My college and post-college friends tolerate my spastic communication style and irregular visits and seem plenty happy to see me every time. And do not make fun of me for the fact that their lives have moved beyond college and sometimes I think mine has not.
  • Caitlin and Stephanie make me exercise. And put up with me when I cry. WAYYYYY too much. And put up with me being a dictator in the kitchen and absolutely crazy when driving.
  • Tim and Tanya invite me to dinner, and Thanksgiving, and are wonderful neighbors and friends. And are always supportive, even if my issues are really trivial at times.
  • I am one of the lucky teachers who has autonomy in the classroom, and an entire network of amazing educators who think ambitiously and never let me think that last years ideas were good enough.
  • I have a cat who likes to cuddle, purr, chew on my feet, and knock glasses of tea on my laptop. Oh, wait. Maybe just the first two. But dang is he cute when he does it.
  • Hannah who has a matching tattoo. Which means a lot. How many people do you know who would permanently scar their body with you? On purpose and while completely sober? 
  • If I forgot you, I am also thankful for you. And the fact that you are not going to yell at me for forgetting.


And, honestly, I’m ridiculously thankful that I have lived almost 29 happy, healthy years with amazing people around me who like me just the way I am. (Right?)

Tuesday, October 25, 2011

Blueberry Muffin Bread Pudding


 Or, on the joys of internet dating. And getting burned. Literally and figuratively.

Also known as: I hope my mother isn’t reading this.

Dear gentlemen who like to meet women on-line:
  1.  Professing extreme distaste for my choice of job is not a good way to make a first impression. First, it makes me think you’re an idiot. Second, it is offensive. Third, I don’t gasp in horror when you say you sit in a cubicle all day and at least my job involves social interaction.
  2. Are you really laid back and relaxed? Easy-going? Well, I’m sorry to break this to you but I’m not. I have probably been relaxed for roughly 30 seconds in the last ten years. Just a heads up in case your idea of a good time is sitting on the couch staring at the wall.
  3. Can you read? Are you sure? Then maybe you should find out if I am actually interested in dating someone who was 18 when I was five. Gross. Seriously.
  4.  If you don’t find anything funny, we are not going to get along.
  5. If you care deeply about the length, color, or styling of my hair, I should warn you that this is an argument that you are going to lose. I may show up on our next date with neon pink spiky hair just to find out how you react. Childish? Sure, but it’s my hair, so calm down.

Sincerely,
            The nice young lady who is afraid of sea monsters and likes to run marathons.


Perhaps I’m not cut out for this activity. I find it kind of creepy. And I refuse to post pictures of myself at the beach. And frankly, after reading 500 profiles of people who are all laid-back, easy-going, and relaxed, I start to feel like a horrible, uptight person. Except that I frankly think life is way more entertaining when you get excited about things. Or most things. Okay, fine, everything.

Maybe I would get better results if I just wrote an ode to something. Like the Phillies? Or food? Or fire? Or would I sound like a pyro? Let’s give it a shot. . .

Have I ever mentioned that I love fire? And burning stuff? And hot things? Bending glass is so cool. Solid-state phase changes in ceramic pots are amazing (and toxic, fyi). I only wish my aim was a little better. My left arm has it’s own private version of the geologic record, except instead of layered rocks it’s layered burns. I thought the one I got from that bread-baking episode three years was bad, but then I splattered oil on myself, directly on top of the old burn. I get asked at least once a week why I have such a ridiculous looking bruise on my arm. People are only mildly horrified to discover that it’s slightly more permanent than a bruise.

Usually, though, I try to play along with the instructions in the recipes and take things out of the oven before they become a flour-based version of my arm.

Which is why this outcome was sad:

(I’m going to avoid self-righteous ranting here about how I “never burn anything” and “it must because my new oven sucks”. Let’s be completely honest for a hot second: I’m horribly absent-minded, and even the 9 small minutes it takes for some cookies to bake is pushing my attention span. It’s truly miraculous that this particular fiasco is the exception and not the rule).

I could only make my way through half of one of these before I got really depressed and left them in a bag in my refrigerator for a week. There was a lot of internal angst about what to do: eat them, and be digestively horrified? Give them to friends and apologize for burning them? Throw them out and suffer the guilt of wasting food, the cardinal sin in the waste-not-want-not household of my upbringing?

I don’t know what prompted heading in the bread pudding direction (and I will say that googling “muffin bread pudding” to see if this was a horrible idea was not terribly successful. Turns out, making bread pudding in muffin shape is more popular than using your failed muffins as the base of bread pudding). However, I decided that there were several points in favor: first, I could cut off the burned parts and still have relatively tasty muffins. Second, I would be able to finish off a couple things in my fridge (always a challenge when living the single life, frankly). And finally, I could reconstitute those dry, week-old muffins into something moist, spongy, and rich.

As my friend Caitlin said, this recipe is kind of like cheating, because you start with something delicious, and then you turn it into bread pudding. I mean, seriously people. Seriously. (To quote Caitlin).

And in case you are desperate for more details about my personal life, I will just let you in on a little secret: I have cried every day for the past week, and most of those occasions were in public. I really wish I could stop doing that. That is my justification for the addition of rum. Whatever. It tasted awesome.

Another baking disclaimer: I was pretty irresponsible about proportions. I found a recipe, scaled down, and added my own fun stuff based on what I had. I honestly don’t think you can really mess this up too badly as long as you’re in the ball-park.

Blueberry muffin bread pudding

6+ cups cubed blueberry muffins (if you burned them, cut off the burnt parts. Duh. 1 or 1.5 inch cubes work nicely)

3 cups milk+cream (I just blended all the milk products in my fridge. A lot of recipes argue that more fat is better, but I think it’s personal choice.)
3 eggs
½ stick of unsalted butter, melted and cooled (you can use less.)
¼ cup sugar
1 teaspoon of vanilla
1 teaspoon of cinnamon (or to taste)

Extra fun stuff I added (which is totally optional, and can certainly be varied):
Toasted walnuts (nice texture)
Cubed apples (they were languishing in my kitchen)
A couple tablespoons of rum (add to custard mixture). (Special note to Katie: I used the Flor de Caña, because that’s what I had)

Vague instructions:
  1. Butter a pan. I used an 8x8 glass Pyrex pan. Exactly the right size for the quantities listed above.
  2.  Spread bread cubes around. It should come up pretty much up to and over the top of the pan when loosely spread.
  3. Mix together the custard mixture. Try not to cook the eggs with hot butter. Disaster. I’m serious about the melted AND cooled part. Perhaps I should put “melt butter and let it cool” for instruction #1. Or maybe we can treat this like one of those ridiculous tests that is designed to see if you actually read all of the instructions before getting started.
  4. Add the garnish elements (fruit, nuts, other fun things) to the bread cubes.
  5. Pour the custard mixture over the bread cubes, trying to hit most of the top cubes.
  6. I let this sit in my fridge, covered, for an entire day because I got too tired on the night I was making it. Typical. But that worked great, because then all of the muffin pieces got nice and soaked through with the custard mixture. You could also limit yourself to an hour or just overnight (hot bread pudding for breakfast? Oh my god can I come to your house for the weekend?).
  7.  Preheat oven to 350 degrees F. (I will tell you, if you do a Google search, you could probably make a bar graph of the distribution of temperatures suggested between 300 and 400. Maybe I’ll do that next time I get bored). You can let the cold bread-custard mixture sit out during the preheat. Cook for 35-45 minutes, until top bread pieces and bottom of custard are golden brown. Don’t overdo it. Or burn it. Because I have no idea what you do with burned bread pudding.

I’m fairly sure you can actually make bread pudding with just about any bread-related product. I’m also fairly sure that’s how fancy restaurants make bread pudding seem like gourmet food.

p.s. As I am posting this, I am listening to the world’s most depressing advertisement on the radio. “Are you single and all your friends are married? Do you want to go out but have no one to go with?” Wow. Way to make me sound like a loser.  Now I’m dying to sign up for your offer. 

Wednesday, September 21, 2011

Cinnamon Walnut Brownies

Or, the dangers of biking in Philadelphia.

What do you do when you’re upset? I’ve tried a lot of things in my life, although I do not typically go for the stereotypical “eat a gallon of ice cream” approach. I prefer to bake enough for a small continent.

I’ve gotten used to the idea that biking in Philadelphia is fraught with hazards. Drivers barely follow even the most basic rules of the road (like, stopping at stop lights that are actually red), and when you throw 150 lbs of human and bike into the mix, the results are frequently very bad.

One time my student runners and I tried to list all of the things that are usually in the bike lane OTHER than the bicycles. Here’s what we came up with:
  • The bus. Oh my god. The bus. Bus drivers have their own separate set of spatial realities whereby them being present in the bike lane negates my actual existence. “If I just DRIVE here, the bicyclist will disappear.” Very true, it turns out.
  • And the people getting in and out of the bus.
  • Parked cars
  • Moving cars
  • Cars that claim to be parked but are in fact moving
  • Car doors, suddenly and unexpectedly, often accompanied by a person
  • Merging vehicles (mostly taxis, who seem cheerfully oblivious to my existence or the extra 3 feet of space allotted to me in the road, although my first experience with vehicle-bicycle contact was when a large van merged through the bike lane and clipped me with his rear view mirrors.)
  • Moving trucks
  • The movers in possession of the moving trucks
  • The food cart
  • The food cart’s generator
  • A backhoe
  • Gravel piles
  • Construction materials
  • The remnants of someone’s driver’s side window
  • A hubcap
  • A man in a wheelchair driving the wrong direction (I’d do it too if I were him: some of the sidewalks could classify for an equestrian dressage course).
  • Pedestrians, runners, and other bipeds (sidewalk excuse does not apply)
  • Potholes, potholes, and more potholes.
  • And the usual assortment of nails, screws, and other random object spelling imminent doom for my poor bike tires.

For all of you who feel rage when you see bikers anywhere but the bike lane, I would like to point out the obvious: there’s not much room left for us in the bike lane.

The other things cars around here don’t really do is stop. For anything. Stop signs, yellow lights, pedestrians, and certainly not bikes. Where I grew up, the rule for a stop sign is that you stop, and then you take turns. The lady who almost t-boned me (six inches from catastrophe) this evening on my way home apparently operates by the rule: “as soon as the person in front of me goes I floor it, even if there is someone actually IN the intersection.” (That person in the intersection was me. I waited my turn. I assumed she would wait hers. Whoops.)

Reaction part one: I scream “Oh my f***ing god!” as I veer violently to the left in my effort to avoid getting hit.

Reaction part two: burst into tears. Full on sobbing. Not that this is exactly a rare occurrence with me, but this was special.

Reaction part three: joke with the nice ladies who came to check on me when they saw me sitting on my bike sobbing about the level of profanity that comes out of my mouth when someone nearly hits me. They were lovely. I wish I had gotten their names so I could bring them some of the brownies I’m about to make.

My zen moment:

As I said, when I’m upset, I like to bake. Nothing fancy. Just the kind of thing that makes me think of my mom, snowstorms as a five year old, and being tucked into bed with a cup of tea.

This is based on another favorite from the Joy of Cooking. I’m a big fan because they basically give you permission to play around with the amount of chocolate and butter. Upset me says, “More butter!”

As with most of their recipes, in the book, this one appears with the ingredients interspersed with the directions and special tips. I'm going to break with that tradition here (although I love it), because I have my own comments about the ingredients.

Cinnamon Walnut Brownies (inspired by the near disaster, the Joy of Cooking, and the movie Chocolat. . . I know, how ridiculous).

Ingredients:

  1. Chocolate and butter. In this recipe, they say that the proportions are negotiable. I took them seriously. If you like to follow the rules, you need 1/2 cup butter and 4 oz unsweetened baking chocolate. I added a little bit more of both.
  2. 4 eggs at room temperature. Or as close to that as you are patient enough to get. 
  3. 1/2 teaspoon salt
  4. 2 cups sugar
  5. 1 teaspoon vanilla
  6. 1 cup sifted all-purpose flour. Maybe you don't have to sift, but if you're going to go to all the trouble to get your eggs nice and foamy (more about that later), you might as well sift. Plus, it's only one cup. In this case, sift first, then measure.
  7. 1 cup walnuts (I like these better than the recommended pecans) and 1 cup chocolate chips (not at all part of the original recipe. What can I say. I had a bad day.)
  8. Cinnamon. I didn't measure. I just started sprinkling. Irresponsible? Yes. Delicious? Duh.
Instructions:
  1. Preheat oven to 350 degrees. 
  2. Melt the chocolate and butter in a double boiler. In my case, that means a pot with boiling water and a pyrex bowl balanced on top. Let this cool. Go do something else for a while, especially if your eggs are still cold.
  3. Beat the eggs and salt with a hand mixer until they are light and foamy. Literally, the volume should increase, and it should look like light yellow egg froth. 
  4. Gradually beat in the sugar and vanilla. By the end of this, you should have a very thick, foamy substance that looks like it could be turned into some delicious meringue-like substance. After you are done with this, put the beater away.
  5. Partially fold in the chocolate-butter mix with "a few swift strokes." When not-quite-blended, do the same with the flour. Before the flour is fully mixed in, add the extras (walnuts, chocolate chips, liberal sprinkling of cinnamon).
  6. It is possible that there is a better time to add the cinnamon. I don't know what it is. 
  7. Pour into a pan (9x9, 13x9, something close to that), and bake for 25 minutes. Or something like that. My experience with brownies says that you don't really want to do overdo the cooking because dry brownies are gross. Better to take it out a bit early than a bit late. Especially since they'll be sitting in the pan until cool and therefore continuing to bake a bit.

I’m now going to go stuff my face with warm brownies and go do yoga with the lovely and talented Tanya. And perhaps not get back on my bike for a while. Although I sure do feel better now.

p.s. why have I never had cinnamon in brownies before? 

Sunday, September 18, 2011

Zucchini Peach Spice Bread


            I’m writing this on a Sunday. Sundays are challenging for me. I find myself tormented by the debate of exactly how much work I should do. . . Enough to make this the most amazing week of my teaching career? Enough so that I’m decently prepared tomorrow? Do I work on revising long term plans, try to design one amazing lesson (emphasis on try), or just settle for doing the same thing I did last year? (insert horrified gasp here.) Or should I just relax and pretend that sleep is the only thing I really need to be a good teacher? I’m sure you can guess which one sounds most appealing on Sunday afternoon.

            For all of you non-teachers, I would like to take this opportunity to discuss what the beginning of the school year is like for me. As a student, I remember thinking that the students were the only ones for whom the new school year brought new and interesting things, the feelings of anticipation and uncertainty. After all, teachers just do the same thing every year, so after a while, it probably loses the novelty, right? Adults are always in control of everything that happens in the classroom, right? Once you’ve planned a great lesson, you can assume students will learn according to plan, right? HA!


I start having back to school nightmares before school is even out for the summer. Not because I don’t love my job. My job is sweet: I work with great people, have a fascinating and compelling diversity of students, and am the sole determiner of what we do in the class. I have nightmares about the kind of stupid stuff that would never actually happen in real life (“Oh no! I only have 29 notecards and I have 33 students! The students are going to revolt!”) Things that would never in a million years bother me in real life become epic battles in my subconscious ("What?!? You're wearing green shoes? That's outrageous!"). I wake up convinced that I have definitively ruined the lives of countless teenagers before the end of the first week of school. So much for summer being restful.

            I spend the whole summer dreaming about how this year is going to be even better than the last, trying to synthesize everything I have learned from workshops and teaching during the last year into a new and amazing version of my curriculum. I write down millions of ideas on random scraps of paper (I am still finding them. . . ), send myself emails, have 17 different conversations with ten different people about how to design an effective grading system, agonize over how to make a curriculum that is challenging and accessible for everyone. It took me an entire week to decide what I was going to do on the first day of school and what I wanted to say in my syllabus. I really enjoyed the first day of school this year. In the end, it looked a lot like this: we tried, we failed, we ate marshmallows. But then the pressure is on: now that I’ve set the tone, students are going to expect every day to be like this. How do I keep them believing in themselves and me long enough to learn some cool stuff?

            And when I approach nervous breakdown and borderline panic about the potential for heretofore unseen success (at least within my own minimal experience) or complete disaster in my classroom, I take a break to wreak havoc on my kitchen. Seem totally impractical when in the throes of planning for a new school year? Perhaps. Somehow, it makes me feel like I’ve accomplished something, and that helps me refocus on practical issues like, “What am I teaching tomorrow?” Which triggers another downward spiral of, “How does this fit into my grand plan for my students? Can I make this lesson better? What if I totally change it so that students are more engaged? HOW DO I DO THAT?”

            On to delicious things:

I’m fairly sure that when my mom made this when we were little, she thought she was pulling a fast one on us by putting vegetables in the baked goods. Fortunately for her, I think she fed us this wonderful bread before we were old enough to understand the concept of a zucchini apart from the bread, and so the first time I had a zucchini not in the bread, I was almost certainly very disappointed. VERY. But the association with this bread convinced me that it must be delicious, somehow. While I am now enthusiastic in my zucchini eating, including but not limited to various vegetable casseroles, grilled vegetable sandwiches, and one fascinating recipe in which you replace pasta with zucchini strips (which was the original destination for this zucchini, until I realized that I no longer own a vegetable peeler), baking with zucchini remains at the top of my all time favorite uses.


Have I mentioned that I love James Beard?


            I recently moved to a new apartment with an oven that is smaller than the old one and electric. I was afraid to turn it on in my un-airconditioned living space until the temperature actually dropped below 70 degrees. As fall has apparently arrived with gusto, the baking experiments can recommence. This recipe was inspired by (a) the aforementioned infatuation with James Beard and (b) my new passion for “garbage-disposal baking”. Since I am living by myself for the first time, I am realizing that it is up to me to actually deal with all of the stuff in my refrigerator, and sometimes it gets a little dire. . . At which point I just starting putting it all in the same pan. Very, very exciting, people.

            I am going to bring this to my teacher class tomorrow so we can talk about how to do everything I described above calmly and effectively. And if you know a first year teacher, please give them a hug. Because learning how to teach is still the best example I know of “trial by fire.” I’ll also be sharing it with my adorable new advisees since I apparently still haven’t learned to plan things out and ended up grating 1.5 times as much zucchini as required.

Zucchini Peach Spice Bread
Adapted from “Carl Gohs’ Zucchini Bread” in James Beards’ Beard on Bread

I used hazelnuts (aka filberts) in this case because I have an advisee with a walnut allergy. And I had some left over from another recipe. How convenient. Normally, I’m a walnut person (that’s the maternal influence right there), but while we’re experimenting, why not try a new nut.

Ingredients (the correct ones, if you know how to measure things out ahead of time, unlike me):

3 eggs
2 cups granulated sugar (or get crazy with some brown sugar. . .)
1 cup vegetable oil
2 cups grated, peeled raw zucchini
1+ very ripe peaches, cut into tiny chunks
3 teaspoons vanilla extract
3 cups all-purpose flour
1 teaspoon salt
1 teaspoon baking soda
¼ teaspoon double-acting baking powder
3 teaspoons ground cinnamon
½ teaspoon ground ginger
¼ teaspoon ground cloves
1/8 teaspoon ground nutmeg
1 cup coarsely chopped filberts (hazelnuts) or walnuts

What to do:

            Preheat your oven to 350° F. It is important not to overdo it on the temperature, because you don’t want to burn the outside of the bread while the inside is still gooey, which can easily happen with dense mixtures like this.

            This follows the fairly traditional approach of: mix the wet ingredients, mix the dry ingredients, mix them together, then fold in the nuts. Surprise!

            Eggs first. Beat until nice and foamy. Or as close as you can get. I didn’t try very hard on this part because I wasn’t seeing a lot of progress. No disaster. Add the sugar, oil, zucchini, peaches, and vanilla. Mix. (This whole part is really easy if you have a stand mixer, but the grand tradition of hand stirring will certainly work just as well.)
            Mix together all of the dry ingredients. If you want to stop with the spice after cinnamon, you should feel free to do so. I like the spice. Add the dry ingredients to the wet ingredients and stir until blended. Stir in the nuts.

            Spoon/pour the batter into well-buttered 9x5x3 inch loaf pans. Seriously on the buttering. Very important. This recipe takes a solid hour to cook. I made dinner while I was waiting. I felt very good about my multi-tasking. Especially when I didn’t forget that there was something in the oven, which has happened on more than one occasion recently. (That’s the other thing that happens at the beginning of the school year).

Things I learned:
  1. The Cuisinart heavy duty food processor is one of the most delightful pieces of machinery in the history of cooking implements. Seriously. Three zucchinis grated in under 30 seconds. I am not lazy. I just enjoy nice machinery.
  2. My new oven is really small. Three loaf pans is pushing it. This could make for a very exciting year for baking.
  3.  Small oven means it is really easy to burn the bottom of the loaves. Whoops.
  4. A paring knife is really not adequate for chopping hazelnuts. Duh.
  5. Different pan sizes = different baking times (okay, I already knew that, but I was reminded of it here.)


Off to plan tomorrow’s lesson!

Saturday, June 25, 2011

Roasted Nectarine and Lime Custard Cake

I recently started watching The Wire, obviously years behind everyone else in the universe who has cable, a wallet, or Netflix. What can I say? I know I have no self-control, and things with a tendency toward developing an addiction, including shows like The Wire, require special circumstances in which I will not be beset by the guilt of shirking my duty coupled with the knowledge that there’s nothing I can do about it. Okay, maybe I’m not quite that delinquent, but I do know that The Hunger Games, The Wire, and reading everything ever written about Nectarine paste is something best left for an overabundance of spare time. Thank goodness teachers get a summer break. (Anyone who had to talk to me at any point in June is probably echoing these sentiments right now).


At any rate, despite the fact that this show clearly portrays life in inner city Baltimore through a completely un-sugarcoated lens (and perhaps, by proxy, other urban settings), I periodically find myself giggling as I watch the show. Is it the odd juxtaposition of drug violence and the beautiful green sweater I am knitting as I watch it? Or the fact that there is one scene in which literally the only word they use starts with F and ends with K, and has a U and a C somewhere in the middle. Even I, who have burned myself on more than enough hot glass, metal, and ceramic objects in the last decade to have quite a colorful vocabulary, and no doubt said some really obscene things the last time a taxi-cab tried to turn right through me on my bike, have never used such a spectacular array of F-bombs in conjunction with other words. Did you know that it can apparently be used as a noun, verb, and adjective, and frequently, all in the same sentence? Possibly without even other words? Maybe you did know that and you are just too polite to show off your knowledge. Intonation is also important. Keep that in mind the next time you want to show that you can make a grammatically correct sentence using only one word. (I actually read about this in a linguistics book once, but I think they were using a more docile word like “fish” as the example).


In the interest of making it through my first three days of summer break with more than two braincells left, however, I decided to take a break from watching this afternoon and make dessert. I’ve heard there’s a website where you can type in the stuff you have in your cabinet/refrigerator/etc and it will tell you what you can make. I prefer my own version of this, which involves me deciding I want to use some random thing staring mournfully at me from the counter and start mixing and matching recipes until I get what I want. That’s more or less what happened here. I bought nectarines two days ago. I have no idea why, except that I love them. I had no plans for them, and realized that my impending travel plans made nectarine usage a virtual emergency. I also, for some reason, decided I wanted a custard like thing. Despite the name, though, I really think this is more like a soufflé. It’s really not a cake. That is misleading. It has a spongy consistency which is utterly delightful and I would eat all of them if that wasn’t as socially inappropriate as my use of profanity outside of the bike lanes of Philadelphia.


I will say several things about this recipe before we get on with it. First, quantities of things like the lime zest and the nectarine are negotiable. Originally, it was supposed to be lemon. I didn’t have any and was far too lazy to go find one. But for some strange reason we had three limes. So that’s what I used. Second, the foundational recipe also suggested three cups of nectarine paste. From my own experiment, that would involve 12 nectarines and more nectarine past than I think is really necessary.


Roasted Nectarine and Lime Custard "Cake"


8 small custard cups, a muffin tin, or something with similar size/shape


¾ cup sugar

zest of 2 limes

2 Tbsp unsalted butter, softened, + more for pans

3 Tbsp flour

3 eggs, separated

1 cup milk

4-6 nectarines


Cut the nectarines and remove the pit. Place them face down on parchment paper on a baking sheet, and put this in a 350 degree oven for about an hour, until they are nice and soft. Please don’t forget the parchment paper, or the sugary juices of the nectarine will effectively glue the nectarines to the baking sheet. Let the nectarines cool, and then pulverize them in a food processor. You are aiming for a “paste” here. If your nectarines were anything like mine, you will have about 1 ½ cups of paste. Ultimately, I only used one cup, but you could use more if you want, and if you have leftovers, spread it on a piece of oatmeal bread and there will be nothing to worry about.


Preheat the oven to 325 degrees. Diligently butter the custard tins.


Zest the limes into the sugar. Mix the sugar and lime together with the back of the spoon, infusing the sugar with the lime flavor. I learned this trick from one of my favorite blogs, Joy the Baker. It makes the sugar deliciously limey. I honestly don’t know how different the final product would be if you didn’t bother with this but it was so good this way, I say go for it.


Cream the butter and zested sugar together. (It’s not really creaming, honestly, because there’s not that much butter, but at least mix it). Add the flour and egg yolks, and mix thoroughly. Slowly add the milk, and then the nectarine paste to taste. You should have a very liquidy mixture. At this point, I would adjust the nectarine and lime flavors to taste. If you dip your finger in it (ignoring any salmonella dangers) and immediately think “Mmmm, heaven”, then you’re probably all set.


Beat the egg whites until you have soft peaks. Gently fold this into the other mixture with a rubber spatula until it is thoroughly integrated. No omelets in the cake, please.


Pour the mixture into the custard pans. Place these in a baking tray (such as you might use for brownies or a sheet cake) and pour hot water around them. I actually boiled water way earlier in the process, put the custard tins into the tray, poured in the mixture, and then poured in the water, in that order.

If you’re feeling really fancy (which I was this afternoon), you can take a hint from some other delectable custard recipes, and pour caramelized sugar in the bottom of the custard cups before you pour in the custard. To make this, mix:


8 Tbsp sugar

4 Tbsp water


In a saucepan, and heat over medium-high heat until it is a light amber color. Pour immediately. Seriously. You are caramelizing sugar. Don’t wait.


There appears to be some debate about whether you are supposed to stir the sugar-water mixture or not. Some recipes are adamant that you don’t touch it at all, while others insist that you stir constantly. I don’t know what you should do. I stirred whenever I felt like it and wasn’t doing something else (yes, I realize that multitasking in a kitchen with multiple hot things going probably increases my risk of burning and thus unacceptable levels of profanity).


I ate this after a lovely dinner of pesto-grilled chicken with a glass of homemade sangria. I encourage you to do the same.

Tuesday, June 21, 2011

Banana Cake with Maple Buttercream Frosting

There are many things about this recipe that fall under the category of “I used to. . . but now. . .” which makes it even more exciting than the name might indicate. Two friends of mine decided to host a “Day of Awesomeness” in which each attendee would teach the rest of the attendees. . . something. Anything really. Something that we were good at, passionate about, etc. One friend of ours taught us how to draw a portrait that didn’t look like an alien (something I have never successfully been able to do prior to this), we played Improv games (which was the best thing ever, and extra fun ever since I saw this video), and we had a wine-tasting in which we were introduced to the difference between oaked and un-oaked chardonnay (especially exciting since I never knew there was such a thing). So many new skills. Naturally, I taught my friends how to make frosting, a special frosting that I used to think of as something mysterious and complex.

I used to be scared of buying too many bananas because I have (a) a strong dislike of eating bananas that have more than a few brown spots (flashbacks from my mom saying, “It’s not that bad” and eating something that fruit flies would have happily spent abnormally long and healthy lives in) and (b) tremendous guilt about wasting food. However, I then had a culinary epiphany in which I realized that bananas never really go bad. If you, like me, are unjustifiably picky about the bruise level on your fruit, you will be happy to know that bananas can have a wildly successful second life as a baking fruit. In fact, I would actually argue that bananas that are past their raw eating prime are infinitely better for baking. Juicier, more concentrated flavor, and altogether easier to squash. After far too many down and out battles with fruit flies, which simultaneously drive me crazy, gross me out, and make me unwilling to eat any of the fruit in my kitchen, I started pre-empting the rotten fruit problem by freezing bananas I wasn’t going to eat (I also used to think this was a no-no. Wrong. GREAT idea). Let’s be honest: I know when I’m not going to eat them. I look at them and think “Gross.” I don’t eat things that I think are gross (which includes store-bought cookies most of the time). Rather than allowing myself to think that over the course of multiple consecutive days, I now just put them in the freezer as soon as that point comes. Or as soon as I’m thinking, “Oh darn, I just bought eight bananas and I’m leaving town.” As previously stated, I don’t worry about doing that anymore because they will still be good for baking.


The best part is that when you taking them out of the freezer and let them unthaw, they are so deliciously juicy, and just slither right out their peels. (I severely grossed a former roommate out once when she saw me making banana bread with bananas like that. She declared it could not possibly be healthy, and I retaliated that she should just wait until she tasted the banana bread that would have the richest banana flavor she had ever tasted). I sometimes even put them in the freezer before they’ve reached the “gross” stage when I’ve decided I want to make banana-something just so I can get that concentrated flavor.


The central component of this recipe comes from the Joy of Cooking. I confess that the movie Julie and Julia in no way diminished my love of this book, despite it’s withering commentary. First, it has a banana cake recipe, which is so delicious and fluffy that I would literally eat it every day if I could. Second, it has such delightful skeleton recipes for so many different base foods that even if I don’t make the exact recipe, I am able to construct a recipe around the guidelines given. Third, I like the way the recipes are laid out with the instructions interspersed with the ingredients so I don’t accidentally add all of the sugar when I was only supposed to add half of it. (I have maintained the original structure below so you too can enjoy that. Or decide you prefer the traditional method. The only problem is that it makes marshalling all of your ingredients ahead of time a tad challenging as you hunt through the recipe for each component).


Banana Cake (from the Joy of Cooking):


Says the recipe: “Do try this, if you like a banana flavor”. (I’d say try it even if you’re on the fence)

Preheat oven to 350 degrees. Prepare two 9-inch round pans. The original recipe says “greased”, but I wrote myself a very assertive note in the margin that says “grease not enough!” I suspect because I once ripped the entire bottom layer of the cake layers trying to get them out of a greased pan. I recommend also using parchment paper (and greasing that as well) or dusting the grease with flour. Otherwise you may well have a horribly depressing experience in which your cake layer becomes chunks o’ cake on your cooling rack.


Have all ingredients at about 75 degrees (or whatever room temperature is for you these days.) It is always wonderful and highly effective if you can actually do this, but not really the end of the world if you forget to plan that far ahead and just yank things out of the refrigerator.


Sift before measuring:

2 ¼ cups cake flour*

Resift with:

½ teaspoon baking powder

¾ teaspoon soda

½ teaspoon salt


Sift (separately):

1 ½ cups sugar


Cream:

½ cup butter

Add the sifted sugar gradually. Cream until very light. Beat in, one at a time:

2 eggs


Prepare:

1 cup lightly mashed ripe bananas

Add:

1 teaspoon vanilla

¼ yogurt or buttermilk**


Add the flour mixture to the butter mixture in about 3 parts alternating with thirds of the banana mixture. Stir the batter after each addition until smooth. Bake in the prepared pans for about ½ hour. Cool completely before frosting.

Although I have never tried it (because I rarely have ripe and frozen bananas out at the same time), the recipe suggests putting banana slices between the layers and then using a white frosting. It also says that if you are serving immediately, you can just sprinkle with powdered sugar or serve with ice cream. However, since I was trying to teach my friends how to make frosting, I decided on the exact opposite of this simple approach and went for a maple buttercream frosting. You could do almost any kind of frosting you want that would taste good with bananas: lemon icing, chocolate ganache, whatevs. Knock yourself out. This frosting was wonderfully fluffy and creamy, and I managed to avoid the thing that often drives me crazy about buttercream frosting which is the tooth-rotting sweetness.


Maple Buttercream frosting

1 stick of unsalted butter, at room temperature but NOT melted

A few tablespoons maple syrup

3 cups (+/-) powdered sugar

Milk as necessary


I think this kind of frosting is one of the most obvious examples of situations in which you should most definitely not melt your butter if you are trying to get that light fluffy frosting. That means you need to plan ahead and let it sit out for several hours. Fortunately, since the cake layers have to cool, if you get out the butter when you start the rest of the cake (or even when you got out the butter for the cake), you’ll be in good shape.


Using a hand mixer, cream the butter until it is “light and fluffy”. Add the maple syrup (to taste, as they say, although if you start tasting the butter-maple syrup mix you may never actually get as far as having frosting. . . Once that mixture is well mixed and creamy, sift in the powdered sugar. I would argue again for the “to taste” approach here, because you can always add milk if you add too much sugar. I added a small enough quantity of sugar that I didn’t need to add any milk, and there are a range of consistencies that could work out really well.


If the frosting is too runny when you are ready to frost, you can either add more sugar to stiffen it up (if that doesn’t interfere with the flavor you want) or put it in the refrigerator for a few minutes.


*Since I rarely actually buy cake flour at this point, I used all purpose flour. According to the Joy of Baking website, you can substitute one cup cake flour with ¾ cup all-purpose flour and two tablespoons corn-starch. It works amazingly well.


**I have used both at various times with equally great success.

Wednesday, June 1, 2011

Best Ever PB&J Bread

Up until very recently, when I discovered that when I make oatmeal I can put all kinds of delicious things in it that my mother would never approve of (maple syrup, for example) and also found this recipe, James Beard's Oatmeal Bread is the only form in which I willingly ate oatmeal. And when I say willingly, I mean that I actually have a mental block when it comes to peanut butter and jelly sandwiches that makes it hard for me to imagine them NOT on this bread. I probably ate this bread every day of elementary school, slathered in Adam’s All Natural Peanut Butter and homemade jam (yes, that also makes the sandwich better. . .) and still probably eat it two to three (some times even five) times a week. I also think it is completely insane whenever anyone suggests using this bread for anything else, although it is quite delicious for many things, including roasted vegetable sandwiches with mustard and melted cheese.


Whenever anyone starts talking about making bread, I just assume they use James Beard’s Beard on Bread. I once got a pub-quiz question right for which the answer was the James Beard Award. My copy of the book (which I bought the first time I saw it in a store) automatically opens to the page with this recipe (not that I need the recipe anymore, since not only is the recipe memorized but also my mother’s commentary from the first time she sent it to me, before I owned the book). I put the recipe in any “Family Recipe” collection gathered by friends, and have been known to plan entire weekends around my desire to make and/or eat it.


If you’ve ever woken up and wondered what kind of arm work out to do for the day, wanted to punch someone but decided that it was socially inappropriate, needed an excuse to spend the entire day in your house in your pajamas taking naps every two hours, or just wanted to eat the world’s best peanut butter and jelly sandwich, this is the bread for you. Since I purchased myself a stand mixer a year and a half ago, the otherwise muscularly challenging mixing process has been eased significantly, although I still do a considerable amount of the kneading by hand just because it is so satisfying and helps work out some of that rage-without-an-outlet that accumulates when you commute by bicycle in a big city. More on bike lanes at a later date.


The one caveat I have about this bread is that the rising is very challenging in the winter. As in, you may end up with dense midget loaves unless you preheat your entire kitchen. This could be a failure on my part in some way, but if I didn’t pretty much have an addiction to this bread that makes it seem like it should be a controlled substance, I would probably stop making it during the winter months. Hot humid summers in Philadelphia, on the other hand, are perfect, and you end up with light, moist loaves with a lovely crumb.


Adapted from Maryetta’s Oatmeal Bread, James Beard’s Beard on Bread


Ingredients

4 cups boiling water

3 cups rolled oats (Quick or regular, either works)

7.5 to 8 cups all-purpose flour, approximately, preferably unbleached (but not whole wheat!)

2 packages active dry yeast

2 tablespoons salt

4 tablespoons salad oil (I use olive oil)

1/2 cup molasses (really, you can use anything from a couple tablespoons to 1/2 a cup, depending how strong you want that flavor to be; maple syrup also works but has a different flavor)


Pour the boiling water over the oatmeal in a large bowl and leave to cool. (You do not want it to be cold or entirely cool. It should still be warm when you get to the next step, just not boiling, and you want the oatmeal to fully absorb the water. Use your judgment but if you burn your hand when you touch the bowl, it is too hot.) Then stir in 2 cups of flour and the yeast. (I always feel like "stir" is a generous overstatement of what I'm actually doing here, but the goal is to mix the flour and yeast into the oatmeal as much as possible). Place in a warm, draft-free spot and allow to rise, uncovered, until doubled in bulk (roughly. A note about rising: the warmer it is, the faster it is. If you stick it next to a drafty window, you will probably still be waiting next Christmas. If you can't rely on the temperature of your kitchen, what I usually do is boil more water than I need and keep the remainder covered while the oatmeal is cooling. When it is rising time, I just put the bowl on top of the pot with the water, and this is usually enough warmer that it helps. Or, you could turn the oven on briefly and put the bowl on top). If you listen carefully later on in this stage, you can hear the dough making a gentle popping noise as it rises. . . the science nerd in me went crazy the first time I realized this. I wrote it in my book because it seemed really important.

Punch down and work in (stir) the salt, salad oil, molasses, and enough of the remaining flour to make a stiff dough (I struggle with this part because you really do want it to be pretty stiff before dumping it onto the bread board, but it is also REALLY hard to stir. So, pretty much, keep adding flour until you can no longer stir and integrate it. This part is a lot easier if you do it in the mixer with a dough hook). Turn out on a floured board and knead, adding extra flour if necessary (almost certainly necessary) to make a smooth, pliable, firm dough--about 10 minutes, but you cannot knead too much (okay, maybe it takes James Beard 10 minutes and my mom 5, but it usually takes me closer to 15 or 20. The key to kneading is that you are basically folding the far side of the dough towards you and than making a pushing away motion. There are some awesome YouTube videos of people demonstrating this. You are trying to turn the individual bits of flour into long gluten molecules, so think of it like pushing and stretching. When you have kneaded in one direction a couple times, turn the dough 90 degrees and repeat. It will basically get skinnier in one direction, and then when you rotate it, you are now using the skinny direction to your advantage). You can also do most of the hard work in a stand mixer, and then finish it off by hand (that's what James Beard himself suggests if you have a stand mixer. . .)


Divide the dough into three equal pieces (I always screw this up, but do your best to estimate even pieces), and form into loaves to fit three BUTTERED 9x5x3-inch loaf tins. Allow to rise again, uncovered, until doubled in bulk. Bake in a preheated 350 degree oven 40 to 60 minutes, or until the bread sounds hollow when removed from the tins and rapped on top and bottom (and is a nice brownish color). Cool on racks before slicing and eating 17 PB&Js in a row.